


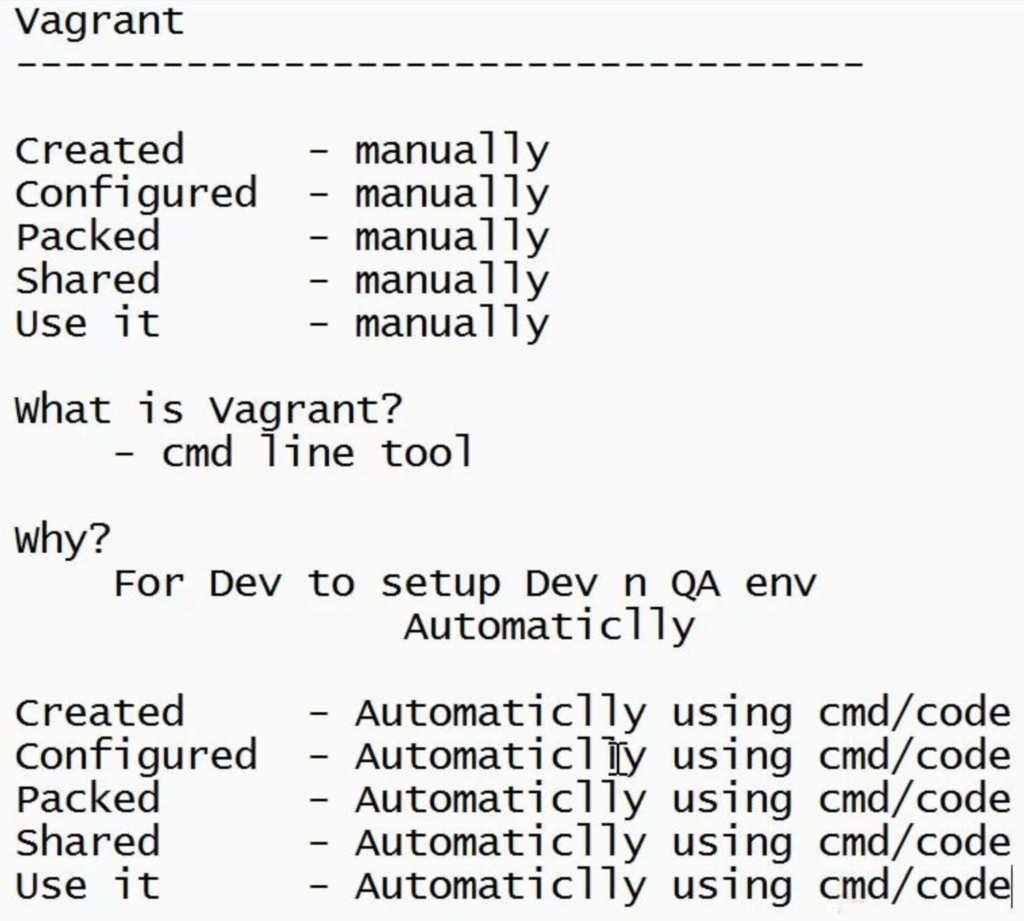
Vagrant is a tool for building and managing virtual development environments. It allows developers to create and configure virtual machines with a specific operating system, applications, and configuration and then easily share these environments with others.
One of the key benefits of Vagrant is its ability to use configuration files to automate the creation and provisioning of virtual machines. These configuration files, called “Vagrantfiles,” specify the operating system, applications, and configuration for the virtual machine. When Vagrant is run, it reads the Vagrantfile and creates a virtual machine with the specified configuration. This allows developers to easily create and replicate development environments, which can be useful for testing and debugging code.
Another benefit of Vagrant is its ability to integrate with popular configuration management tools, such as Ansible and Puppet. This allows developers to use these tools to automate the provisioning of virtual machines, including installing applications and setting up configuration files. This can save time and reduce the risk of errors when creating and configuring development environments.
In addition to its use in development environments, Vagrant can create and manage virtual machines for other purposes, such as testing and staging environments. This can be useful for organizations that need to test code or applications in different environments before deploying them to production.
Vagrant is also highly customizable, allowing developers to use custom boxes or pre-configured virtual machine images to create and provision virtual machines. This can be useful for developers who need to use a specific operating system or application stack or want to use a custom configuration for their development environments.
One of the key advantages of Vagrant is its ability to share virtual machines with others easily. Vagrant uses VirtualBox to manage virtual machines and allows developers to package their virtual machines into a single file called a “box.” This box can then be shared with others, who can use Vagrant to import the box and start using the virtual machine. This can be useful for teams who need to share development environments or for organizations that need to distribute virtual machines to multiple users.
Overall, Vagrant is a powerful tool that allows developers to easily create, configure, and share virtual development environments. Its ability to use configuration files integrate with configuration management tools, and support custom boxes make it highly customizable and flexible. Its ability to easily share virtual machines makes it an ideal tool for teams and organizations that need to collaborate on development projects.
How to Setup and Use a Vagrant Box
-
Install Vagrant on your local machine. You can download Vagrant from the official website at https://www.vagrantup.com/.
-
Find the box that you want to use. You can search for boxes on the Vagrant Cloud at https://app.vagrantup.com/boxes, or you can find boxes on other websites or GitHub repositories.
-
Once you have found the box that you want to use, copy the URL or the path to the box file.
-
Open a terminal and navigate to the directory where you want to create your Vagrant project.
-
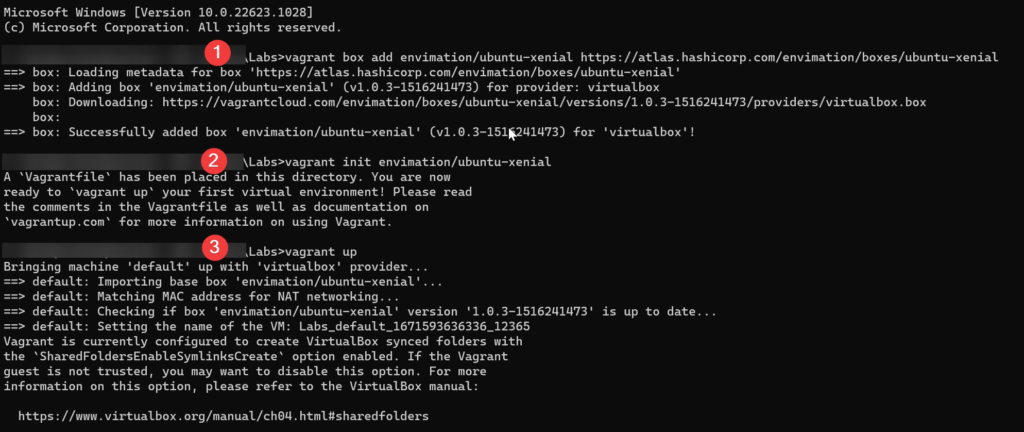
Run the following command to add the box:
vagrant box add <name> <url>. Replace<name>with the name you want to give the box and replace<url>it with the URL or path to the box file. -
Vagrant will download the box and add it to your local collection.
-
To create a new Vagrant project using the box you just added, run the following command:
vagrant init <name>. Replace<name>with the name of the box you just added. This will create a default Vagrantfile in the current directory. -
Open the Vagrantfile in a text editor and modify the configuration as needed. You can specify networking and synced folders, and more.
-
Once you have modified the Vagrantfile to your liking, run the following command to create the Vagrant box:
vagrant up. This will create the virtual machine and boot it up. -
Once the box has been created, you can connect to it using.
vagrant ssh.
That’s it! You should now have a Vagrant box that you added from the Internet.
Download boxes from:
https://www.vagrantbox.es/
https://app.vagrantup.com/boxes/search
Workflow steps
– To use the available boxes just replace {title} and {url} with the information in the table below.
$ vagrant box add {title} {url}
$ vagrant init {title}
$ vagrant up
Example:
vagrant box add envimation/ubuntu-xenial https://atlas.hashicorp.com/envimation/boxes/ubuntu-xenial
vagrant init envimation/ubuntu-xenial
vagrant up
How to export a vagrant virtual machine and import it on another machine
To export a Vagrant virtual machine for transfer, you can use the vagrant package command. This command will create a virtual machine package in the form of a single file that can be transferred and imported to another machine.
Here are the steps to export a Vagrant virtual machine:
- Open a terminal and navigate to the directory where your Vagrant project is located.
- Make sure that the virtual machine is stopped. You can stop the virtual machine using the
vagrant haltcommand. - Run the following command to create the package file:
vagrant package --output <filename>.box. Replace<filename>with the desired name for the package file. - Vagrant will create the package file and place it in the current directory.
- Transfer the package file to the destination machine using a secure method such as SFTP, SCP, or a USB drive.
- On the destination machine, install Vagrant and navigate to the directory where you transferred the package file.
- Run the following command to import the package file:
vagrant box add <name> <filename>.box. Replace<name>with the desired name for the box, and replace<filename>with the name of the package file. - Vagrant will import the package file and add it to your local collection of boxes.
- To create a new Vagrant project using the imported box, run the following command:
vagrant init <name>. Replace<name>with the name of the imported box. This will create a default Vagrantfile in the current directory. - Open the Vagrantfile in a text editor and modify the configuration as needed. You can specify networking and synced folders, and more.
- Once you have modified the Vagrantfile to your liking, run the following command to create the Vagrant box:
vagrant up. This will create the virtual machine and boot it up. - Once the box has been created, you can connect to it using
vagrant ssh.
That’s it! You should now have a Vagrant virtual machine that has been exported and imported onto another machine.


